This guide will cover the basics of migrating one or more cPanel accounts from an existing cPanel over to another.
This guide will require full root access on both servers.
This guide also requires an intermediate understanding of account-level settings and DNS related functions such as delegation and propagation.
Log in to the destination server you wish to transfer the account(s) to, and locate the cPanel menu item called ‘Transfer Tool’.

From there, you will need to enter the following details:
The IP address of the server you are migrating from
The SSH port (typically port 22)
The root password of the IP address you are migrating from
Note
If your server(s) have any active firewalls, you will have to whitelist each servers IP in their firewalls.
Then click "Scan Remote Server".
If the information you have entered is correct, it should present a list of accounts available for transfer from the previous server. Otherwise, observe the error message that you received and check the details that you have entered, and try again.
From here, tick the accounts you wish to transfer.
If the account has a dedicated IP address on the source server, you can choose to preserve these settings on the new server. The system will try to find an appropriate free IP on the destination once the account transfers and unpacks.
You can also click the ‘Packages’ tab and select any custom Packages to transfer over as well. This would include settings for accounts such as quota, number of databases etc.

Do not use the ‘Live Transfer’ setting as it most often doesn't allow proper site or configuration checking before DNS goes live!
Click ‘Copy’ at the bottom.
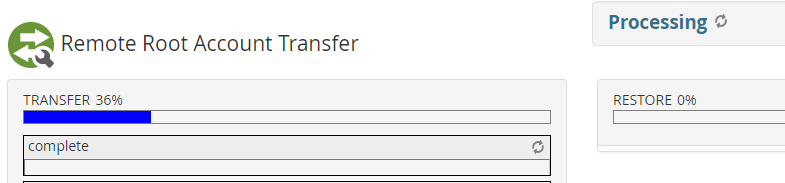
The transfer process should begin:
Once the transfer and unpacking process has been completed, you should receive a summary of the actions taken:
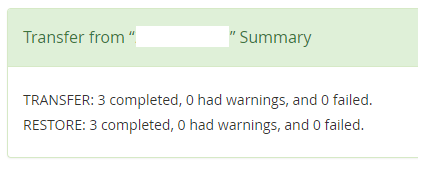
If there are any errors or warnings they should be visible here. Depending on the nature of the errors or warnings, some further actions may be required. If any adjustments have been made server-side, the transfer tool can be run again. Select the option to "Overwrite" for the accounts that were having difficulties.
Assuming the transfers were successful, at this point, you should test your site(s) using the HOSTS file method to see how they are behaving on the new server before making any DNS or delegation changes.
6. Once you have confirmed that your sites are working, you can change the DNS to point to the new server.
If you are unsure of any of the terms, settings, methods, or functions used in this guide or would like further assistance with migrating accounts, please contact our support team.